(continued from Using the ASI Write On for iPod Touch)
The following sections are suggestions and rules you should follow to maintain the integrity of the iPod units and the Write-On for iPod Touch application. Following these rules is extremely important for the overall success of the Write-On system.
Keeping the battery charged is essential. It is suggested you use a USB hub to charge the devices. Keep in mind that most USB hubs don't charge devices unless USB connection is active to computer. It is also highly recommended that the USB hubs are connected to the computer with the iTunes program. This will also aid you when having to upgrade the Write-On app. iPods should be charged during down periods of the business day. Examples are periods between lunch and dinner in addition to overnight hours when business is closed.
General Rules for Charging iPod Touch
Disconnecting the iPod when the above messages are displayed may have an adverse affect on the "sync" process or on program settings.
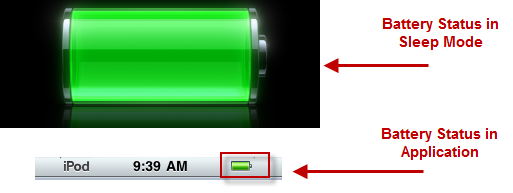
How to check the battery's status
Your iPod displays a battery icon in the upper-right corner of the screen to show approximately how much charge is left. iPod Touch units that are asleep while being charged, a larger version of the same icon appears in the center of the screen.
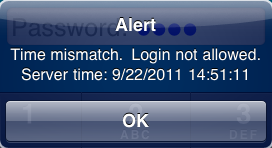
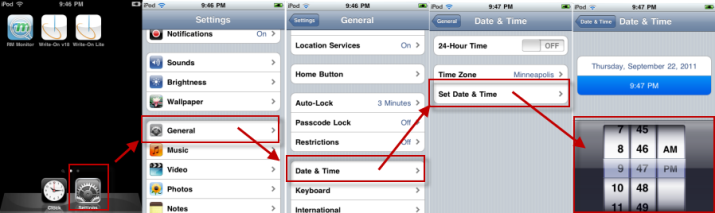
It is essential the iPod’s time is kept current. Employees will not be able to login to the Write-On application when there is a time difference of five minutes between the rmserver and the iPod unit. The following message will occur if the time discrepancy occurs:
You will have to adjust the time on the iPod before being able to login to the Write-On application. Use the following steps to adjust the time:
A known issue exists on the iPod that the time and date reverts to January 1, 1970 when the battery reaches an extremely low level. You will not be able to adjust the time until you first adjust the date.
There are a few simple steps you can take to protect your iPods. Below is a list of suggestions:
If you have an MSR attached to the iPod unit, you will want to clean the card swipe periodically to insure all tracks are being read. Credit card downgrades fee may apply per transaction if all tracks are not read. Use only approved card swipe cleaner to prevent damaging the device.
Keeping both iOS and Write-On software up to date is essential to keeping your system running smoothly. Being on the most current version of software will typically help eliminate current bugs, aids in troubleshooting, and will often add functionality. As example, iOS 5 added the ability to synchronize an iPod wirelessly.
Updating the Write-On app is a two step process. You must first download the Write-On app to the iTunes program. Typically the iTunes store will display a message when a new update is available. Once the new Write-On app is downloaded, you must transfer the app to each iPod device via synchronization. Syncing the app can either be done wireless or when the iPod is docked.
The synchronization of iPod Touch units should always be performed from the same computer hosting the iTunes account. Changing which iTunes account an iPod is associated with means completely removing the app and re-installing from new iTunes. This has the side affect of blowing away all settings. This means a complete re-install is necessary.
As mentioned earlier, update the Write-On should not be done directly from the iPod Touch device. Similar to the initial installation, you will download the updated app from the iTunes store to the iTunes program (Library >Apps) and then transfer the new app to the iPod via synchronization. Below are the specifics steps to follow:
Before setting up syncing, unless instructed otherwise, you should download and install the latest version of iTunes. Wi-Fi syncing requires iTunes 10.5 or later and iOS 5 or later. You can change your sync options at any time. Each time you sync, content is synced between your iOS device and iTunes host computer to reflect new, updated, or deleted content.
Connecting your iPod device to the iTunes host computer is easy using the following steps:
Open iTunes.
Connect the iPod device to the iTunes host computer using a USB cable or docking station
While the iPod device appears in the left-hand column of iTunes, you can select the Apps tab and configure sync options. See the section " Updating/Installing Write-On App on iPod" for updating the Write-On app on the iPod unit.
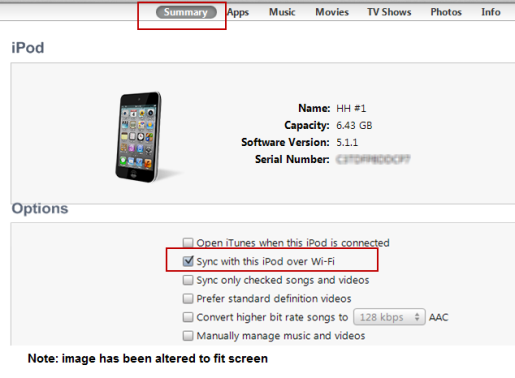
The advantage to Wi-Fi syncing is the iPods can now be stored & charged near where they are used and is no longer limited to be connected to the host iTunes computer. However, WiFi syncing does require that iTunes stays open on the iTunes computer.
Open iTunes
For initial setup, you will have to connect your iOS device to iTunes host computer with an Apple approved USB cable or docking station.
In the Summary tab, select "Sync with this [device] over Wi-Fi".
The iOS device is plugged in to power
iTunes is open on the computer
The iOS device and the computer are on the same Wi-Fi network
While the iPod device appears in the left-hand column of iTunes, you can select the Apps tab and configure sync options. See the section " Updating/Installing Write-On App on iPod" for updating the Write-On app on the iPod unit.
The Write-On for iPod Touch app should be installed using the iTunes software via the “sync iPod” option. This process must be done from the computer with iTunes installed.
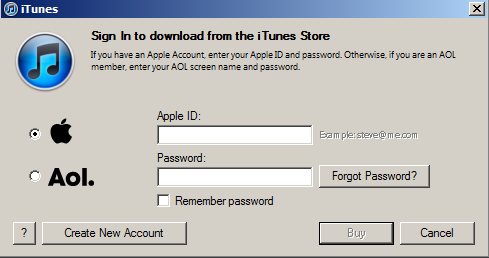
Open the iTunes software on computer. You may be prompted for Account Name and Password
Connect iPod device to iTunes host computer via a docking station, USB wire, or wireless connection.
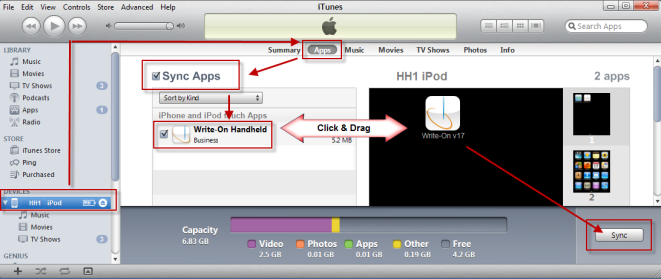
Select the Apps Tab at the top of the pane.
Make sure both “Sync Apps” and the Write-On app is enabled.
Click and drag the RM Write-On app from the list over to the virtual screen on the right.
Click on the “Sync” button at the bottom of the screen to begin the synchronization process.
Verify the installation by locating the app on the iPod Touch device.
You will need to repeat steps B thru E for each device
By default, the iTunes store does not automatically update any downloaded app. This is the preferred setting for handheld users. You can very this option is disable in iTunes by opening the iTunes store with the account used for downloading the iWO app and using the following steps:
There may be an occasion where a new version of the Write-On app produces undesirable behavior not found during beta testing. ASI will attempt to fix the application as soon as possible. In the process, ASI may bring back a prior version of the Write-On app known to work. However, downloading apps with iTunes works in a forward linear methodology. To work around iTunes methodology, the older app will introduced as a new app. For this reason it is important to check for updates on iTunes on a regular basis. Use the same steps to download the app as outlined in the section: Updating the Write-On App .
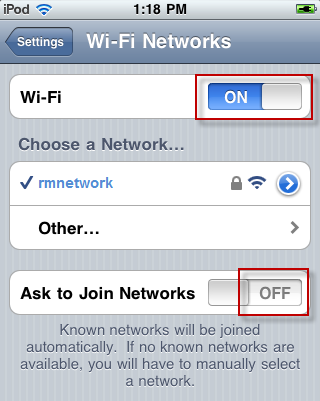
In the iPod Wi-Fi settings screen (Settings > Wi-Fi) make sure the "Ask to Join Networks" option is turned off to insure the device does not seek other nearby networks. Doing so will keep the iPod from easily joining nearby networks and will prevent pop up messages. More importantly, it will help the iPod stay trained on the right network.